

A plain-language walkthrough of AP in BC — from setting up your first vendor to running your first payment batch. For the people who actually have to do this work every day.
BC vs. F&O: A Quick Word Before We Start
If you’ve been reading the F&SCM side of this blog, you already know what AP end-to-end looks like in the enterprise platform. Business Central’s AP process covers the same fundamental ground — vendor setup, purchase documents, invoice entry, approval, payment — but it does it with significantly less complexity and significantly more accessibility.
That’s not a knock on BC. It’s the point of BC. It’s designed for organizations that need solid AP functionality without a team of specialists to run it. The trade-off is less configurability in certain areas. The reward is a system your AP team can genuinely learn in a week and operate confidently within a month.
With that framing set, let’s walk the whole thing.
The AP Lifecycle in BC
Here’s the shape of the process. Not every organization uses every stage — plenty of BC customers skip purchase orders entirely for non-inventory purchases, and some small teams bypass formal approval workflows in favor of Controller review before posting. That’s fine. Know what the full picture looks like so you can make intentional decisions about which parts apply to your situation.

Step One: Setting Up Vendors the Right Way
Everything in AP flows from the vendor card. In BC, the vendor card is the record that carries all the behavioral defaults for every transaction you’ll ever have with that vendor — which accounts their invoices hit, when their invoices are due, how they get paid, and what their tax status is. Getting this right during setup is one of the highest-return investments you can make in the quality of your AP process.
GEN: General Tab — The Basics That Drive Everything Else
Name, address, and the fields that matter more than they look like they do
The vendor name, address, and contact fields are obvious. What’s less obvious — and where I see the most migration gaps — are the Vendor Posting Group and the Gen. Bus. Posting Group fields. These are the posting group assignments we covered in the last post, and they are required. Without them, no AP transaction will post. BC will tell you this loudly with an error message, but it’s much better not to discover the gap at transaction entry time.
The Currency Code field is also on the general tab and is frequently overlooked for domestic vendors. If left blank, BC defaults to your local currency on every transaction, which is correct for domestic suppliers. For foreign currency vendors, this field must be populated so that invoices default to the right currency and exchange rate logic applies correctly. A foreign vendor without a currency code will generate invoices in your local currency, which creates a painful correction exercise when the vendor sends an invoice in euros and someone enters it in dollars.
Don’t Miss These on the General Tab
- Vendor Posting Group — required, drives the AP summary account
- Gen. Bus. Posting Group — required, drives the General Posting Setup lookup
- Currency Code — required for any foreign currency vendor; leave blank for local currency
- Vendor number series — confirm your number series is configured before entering vendors manually or running a migration
PAY: Payments Tab — What Controls Your Cash Timing
Payment terms, methods, and the fields that drive your payment run
The Payment Terms Code on the vendor card defines when invoices from this vendor are due. Net 30, Net 45, 2/10 Net 30, COD — whatever reflects your actual agreement with the vendor. BC uses this to calculate the due date on every purchase invoice automatically. If the terms are wrong on the vendor card, the due dates on every invoice are wrong, your aging is wrong, and your payment run picks up invoices at the wrong time. It’s a small field with a large downstream footprint.
Payment Method Code tells BC how this vendor gets paid — check, EFT, wire, manual. This defaults onto payment journal lines for that vendor, which means your AP team isn’t selecting a payment method from scratch on every payment entry. For organizations running electronic payments, this field also links to your bank export setup, so it needs to be correct for the right payment file format to generate.
If you have vendors who offer early payment discounts — 2% if paid within 10 days — the Payment Discount % and Discount Date Calculation fields on the vendor card are where you configure those terms. BC will then automatically calculate the discount amount and the discount deadline on every invoice, and apply the discount when payment is made within the qualifying window. If these fields aren’t populated, your AP team has to calculate and apply discounts manually, which introduces error and means you probably leave some discounts uncaptured.
Payment Tab Checklist:
- Payment Terms Code — verify against actual vendor contracts during migration, not just what was in the old system
- Payment Method Code — set this for every vendor; don’t leave it blank and select manually each time
- Early payment discount terms — configure them on the vendor card if you have them, and test that BC applies them correctly at settlement
- Preferred Bank Account — for EFT vendors, link their bank account details here so payment exports have the right routing information
TAX: Tax and 1099 Settings
The One Nobody Wants to Deal With Until January
Set it up now. Your future self in tax season will be grateful.
If your organization operates in the US and pays vendors that are subject to 1099 reporting, the vendor card is where you configure that. The IRS 1099 Code field flags which vendors are 1099-eligible and which box on the 1099 form applies — MISC, NEC, INT, DIV, and so on. BC uses this flag at the time of transaction posting to mark qualifying payments. At year end, you run the 1099 report and BC produces the data you need.
Here is the thing about 1099 setup that I cannot say loudly enough: it must be done before transactions post. BC does not retroactively recategorize payments based on a 1099 code you add to a vendor after the fact. If you add a consulting firm as a vendor in February without setting the 1099 code, pay them for six months, and then set the code in August — the first six months of payments are not flagged. You’ll be reconstructing payment history manually at year end, which is genuinely unpleasant and occasionally inaccurate in ways that create tax risk.
The VAT Bus. Posting Group and Tax Area Code fields on the vendor card handle sales tax and use tax on the purchase side. For US organizations with use tax obligations — where you owe tax on purchases from out-of-state vendors — these fields need to be configured correctly. This is a conversation to have with your tax team, not your implementation consultant alone.
Non-Negotiable on Tax Setup
- Set 1099 codes before any transactions post — not after, not “we’ll clean it up later”
- Have your tax team review which vendors are 1099-eligible as part of your data migration review
- If you have use tax obligations, involve your tax team in Tax Area Code configuration — this is a compliance matter, not just a setup preference
- Test your 1099 report output in the sandbox environment before go-live with at least a few representative vendor scenarios
DIM: Default Dimensions — The Automation That Saves Your Team Daily
Where you set it once and the system codes it forever
BC supports default dimensions on the vendor card — dimension values that automatically populate on every purchase document and invoice for that vendor. If your utilities vendor always belongs to the Facilities cost center, set that as a default dimension. If your IT maintenance vendor always belongs to the IT department, set that. The system applies the default on every transaction so your AP team isn’t manually selecting dimension values on routine invoices.
This is one of those setup steps that takes ten minutes per vendor and saves hours per month. Default dimensions also improve data quality — manual dimension entry is where coding errors happen. A default that auto-populates correctly eliminates most of those errors before they start.
Dimension defaults on vendor records work together with dimension defaults on GL accounts and item records. BC applies them in a priority order — item defaults take priority over vendor defaults, vendor defaults take priority over account defaults — so you can set up smart layering where the most specific dimension information available wins, without having to anticipate every combination manually.
Make These Defaults Count
- Assign default dimensions during vendor data migration — treat it as a required field, not optional enrichment
- For vendors that serve multiple departments or cost centers, leave the dimension blank at the vendor level and require entry on the invoice line — but be explicit about that decision in your AP procedures
- Review dimension defaults on vendor cards periodically — if a vendor’s cost center changes, the default on their card needs to be updated too
Purchase Documents in BC: Which One Do You Use When?
BC gives you a few different purchase document types, and picking the right one matters. Using the wrong document type doesn’t always cause an immediate error — sometimes it just causes a subtle problem that surfaces later, usually at month end, usually at the worst possible time. Here’s the clear breakdown.
01 Purchase Order
The formal commitment document. Use when you’re ordering goods or services in advance of receipt and you want to match the vendor invoice against what was ordered and received. Enables three-way matching, inventory receiving, and accrual accounting between receipt and invoice.
Best for: inventory purchases, large service contracts, anything where you need to receive before you pay
02 Purchase Invoice
Direct invoice entry without a preceding purchase order. Use for expenses that don’t require a formal PO — utilities, rent, subscriptions, professional fees. Simpler and faster than a PO but provides no receiving step and no automatic three-way matching.
Best for: recurring expenses, service invoices, any purchase where the PO step doesn’t add value
03 Purchase Credit Memo
Used to record a credit from a vendor — a returned item, a pricing correction, a billing error. Reduces the vendor balance and reverses the original accounting entries. This is the right tool for vendor credits; a manual journal entry is not.
Best for: any situation where a vendor owes you money or where you need to reverse a posted invoice entry
Entering Vendor Invoices — Where Your AP Team Lives
Whether you’re working from a purchase order or entering a direct invoice, the invoice entry experience in BC is designed around the Purchase Invoice page — a header with vendor details, dates, and payment information, and a lines section where you specify what was purchased, at what price, and how it should be coded.
The Invoice Header — What Drives Due Dates and Posting
Small fields, large consequences
The invoice header carries the vendor number, the vendor’s invoice number, the invoice date, the posting date, and the due date. These fields do different jobs and they all matter.
The Document Date is the date on the vendor’s invoice — the date the vendor issued it. BC uses this date to calculate the due date based on the vendor’s payment terms. If you enter the wrong document date, the due date calculates incorrectly, which means your AP aging is wrong and your payment run picks up invoices at the wrong time.
The Posting Date is the date the transaction hits your general ledger — which accounting period it falls in. For most invoices these two dates are the same. But for invoices received after a period close — a December invoice that arrives in January — the posting date needs careful consideration. Post it in January with a January posting date and the expense is in the wrong period. Post it in December (if the period is still open) and it lands correctly.
The Vendor Invoice No. field is BC’s duplicate invoice detection mechanism. BC compares this value against previously posted invoices for the same vendor. If a matching number exists, it warns you of a potential duplicate. This only works if your AP team enters the vendor invoice number consistently — the same format every time. If one person enters “INV-1234” and another enters “1234,” BC sees them as different and the duplicate detection misses it.
Header Fields That Cause the Most Problems When Wrong
- Document Date — must match the vendor’s invoice date, not today’s date
- Posting Date — must reflect the correct accounting period; check with your Controller on late invoices
- Vendor Invoice No. — standardize your entry format and communicate it to the whole AP team
- Currency — verify it matches the vendor’s invoice currency before entering any amounts
Invoice Lines — The Coding That Drives the GL
Where your chart of accounts and posting groups meet real transactions
Invoice lines in BC are where you specify what was purchased. The line type — G/L Account, Item, Fixed Asset, or Charge (Item) — determines how the system routes the accounting. Most direct (non-PO) invoices use G/L Account lines, where you select the expense account directly. PO-matched invoices pull item lines from the purchase order, where the item’s posting group already determines the account.
For G/L Account lines, the account you select drives the expense posting. This is where your chart of accounts design and your posting group setup come together in the daily work. If the account is set up correctly with the right Gen. Prod. Posting Group (remember that from the last post?), the system routes the transaction correctly through the General Posting Setup matrix. If it’s missing or wrong, the posting fails or goes somewhere unexpected.
Dimensions on invoice lines are worth special attention. When a purchase order is the source, dimension values often flow from the PO line automatically. On direct invoices, dimensions need to be entered manually unless defaults from the vendor card or GL account populate them. This is the place where dimension data quality either gets maintained or falls apart — and it falls apart when AP teams are busy, which is always.
Lines Best Practices
- Train your AP team to check dimension values on direct invoice lines — defaults help but don’t always cover every scenario
- For invoices with multiple lines hitting different expense accounts or departments, each line can carry its own dimension coding — use this intentionally
- Item charge lines (for freight, duties, and landed cost) need to be assigned to the correct item receipts — a step many AP teams skip, which misallocates those costs
- The Description field on invoice lines prints on remittance advice and shows in vendor ledger history — fill it in meaningfully, not with “Invoice” for every line
Matching a PO to an Invoice — Three-Way Matching in BC
The control that makes sure you only pay for what you ordered and received
When you receive an invoice against an existing purchase order in BC, the matching process works through the Get Receipt Lines function on the purchase invoice. This pulls in the lines from posted receipts (what was physically received) and ties them to the vendor’s invoice. BC then compares the invoiced quantity and price against what was on the PO and what was received.
If the invoiced quantity is more than what was received, BC will not let you post the invoice for the unrecorded quantity. This is the control working exactly as intended — you can’t pay for goods you haven’t received, which protects against overpayment and against invoices that arrive before the goods do. If there’s a legitimate dispute about quantity, it gets resolved before the invoice posts, not after.
Price differences between the PO and the vendor invoice are handled differently. BC will let you post with a price difference, but it flags it and posts the variance to the account configured for purchase price variance in your posting setup. Persistent large variances are worth investigating — they might indicate a pricing agreement issue, a data entry error on the PO, or a vendor billing problem that needs addressing.
PO Matching in Practice
- Partial receipts are supported — you can receive 60 units and invoice for 60, with the remaining 40 staying open on the PO
- The over-receipt tolerance setting controls how much over the PO quantity BC will allow — configure this intentionally, don’t leave it at zero or unlimited
- If a vendor invoices before goods arrive, hold the invoice until the receipt is posted — don’t force-post it through a workaround that bypasses the matching control
Two Ways to Enter Non-PO Invoices — And When to Use Each
For invoices that don’t originate from a purchase order — utilities, rent, insurance, professional services — BC gives you two entry paths. Understanding the difference helps you choose the right one for your workflow.
01 Purchase Invoice Page
Direct Purchase Invoice
Enter the invoice directly on the Purchase Invoice page, with full header and line detail. You can add multiple lines for different accounts or departments, apply dimensions, attach documents, and route through a workflow for approval before posting.
This is the right choice for invoices with multiple lines, invoices above a certain dollar threshold that need approval routing, or any invoice where you want a full audit trail from entry to posting.
02 Purchase Journal
Purchase Journal Entry
A batch-entry approach where you enter multiple invoices in a spreadsheet-style journal. Faster for high-volume, simple invoice entry — one line per invoice, all in a grid. Less documentation per entry but more efficient for routine, recurring invoices.
This works well for simple, recurring invoices where the AP team knows exactly what the coding is and approval isn’t required before posting. Rent. Insurance. Recurring subscriptions. Predictable, routine, low-risk.
Most BC organizations use both paths — purchase invoices for anything complex or requiring approval, purchase journals for simple recurring entries. The key is having a documented policy about which path applies to which invoice type, so your AP team isn’t making that judgment call from scratch on every invoice.
Approval Workflows — Getting Authorization Before Anything Posts
BC’s workflow engine can route purchase invoices through an approval chain before they’re posted. This is an internal control that matters whether your organization has three people in Finance or thirty. The approval workflow in BC is configured through the Workflow setup pages, and for most organizations, the purchase invoice approval workflow is one of the first workflows to configure.
| Workflow Element | What to Think Through | Common Gap |
|---|---|---|
| Approval thresholds | Who approves at what dollar amount? $500 to a department manager, $5,000 to a VP, $50,000 to the CFO? Define your approval matrix before you configure the workflow. | No thresholds defined — every invoice routes to the same approver regardless of amount, creating a bottleneck for the senior approver and no escalation path for urgency |
| Approver assignment | BC can route to a specific named approver, to the requester’s manager in a hierarchy, or to a user group. Choose the model that reflects your actual org structure and substitute coverage needs. | Approvers assigned by name with no substitute or delegation configured — the first time the approver goes on vacation, invoices pile up and vendors don’t get paid on time |
| Delegation and out-of-office | BC supports approval delegation so approvers can temporarily assign their authority to a substitute. This must be configured and your approvers must know how to use it before someone actually needs it. | Delegation not configured — discovered when the CFO is at a conference and $200,000 of invoices are sitting in their approval queue |
| Notification method | BC sends workflow notifications by email or as Business Central notifications. Confirm that email notifications are configured and tested — and that approvers actually check their BC notification inbox if that’s the method. | Notifications configured but email delivery not tested — approvers never know they have invoices waiting for them |
| Rejection path | What happens when an approver rejects an invoice? Does it go back to the AP team with a reason? Does it get cancelled? Define the rejection behavior so your AP team knows what to do when it happens. | Rejection behavior undefined — rejected invoices end up in a status nobody knows how to handle, and the AP team starts creating new invoice entries instead of addressing the rejected ones |
Payment Journals and the Payment Run — How Cash Goes Out the Door
When invoices are posted and approved, they sit as open entries in the vendor ledger, waiting to be paid. The payment run in BC is the process of generating those payments — creating the journal entries, applying them to the open invoices, and producing whatever output your bank needs to actually move the money.
The BC Payment Run — Step by Step
01 Open the Payment Journal
Navigate to Payment Journals and open the batch you’ll use for this run. BC supports multiple payment journal batches — one for checks, one for EFT, one for wires, for example — which keeps different payment types organized and makes your bank reconciliation cleaner.
02 Use “Suggest Vendor Payments” — Let BC Do the Work
The Suggest Vendor Payments function is BC’s equivalent of the payment proposal in F&O. You tell it which bank account, which payment date, which vendors to include, and what due date range to consider — and BC generates a list of payment lines for every qualifying open invoice. This is the starting point, not the final answer. Review it before you do anything else.
03 Review the Suggested Lines — Every Single One
Look at the generated payment lines before you touch the post button. Check for vendors you didn’t expect to see. Verify that amounts look right. Look for any vendor on credit hold or with a disputed balance. Remove lines that shouldn’t be in this run. Add lines for invoices you want to pay early. This checkpoint is the one that catches errors before money leaves the building — take it seriously.
04 Apply Payments to Invoices
For each payment line, BC needs to know which specific invoices this payment applies to. The Suggest Vendor Payments function usually handles this automatically — it applies each proposed payment to the oldest open invoices first. But verify the application, especially if a vendor has credits or partial payments that complicate the matching. A payment applied to the wrong invoice leaves both the original invoice and the “correct” one in an unexpected state.
05 Export the Payment File (for EFT/ACH)
For electronic payments, BC generates a payment file in the format your bank requires — NACHA for US ACH, SEPA for EU, or a bank-specific format configured in your payment export setup. This file is what you send to your bank. The file format must be configured during implementation and tested with your bank before go-live. Discovering your bank rejects the file format on your first live payment run is an uncomfortable experience.
06 Print Checks (if applicable)
If you’re still running checks — many BC organizations are, and there’s no shame in it — BC’s check printing integrates directly with the payment journal. You post the journal and print checks in the same flow. Check numbers are assigned from a configurable number series. Voided checks need to be handled through the void check process, not manually — voiding through BC keeps your bank reconciliation clean.
07 Post the Payment Journal
Posting closes the loop: it debits the AP summary account (reducing the vendor liability) and credits your bank account (reducing the cash balance). The open vendor ledger entries are marked as closed. The payment appears in your bank reconciliation as an outstanding item until it clears the actual bank statement.
BC-Specific Features Worth Knowing About
A few AP-related capabilities in BC that don’t always get highlighted during implementation but make a real difference in daily operations once you know they’re there.
Document Attachments
BC allows you to attach the vendor’s PDF invoice directly to the purchase invoice record. This creates an electronic filing system within BC — no more hunting through email or a shared drive for the original invoice when something needs to be researched. Set this as a standard practice for your AP team from day one. The audit trail it creates is genuinely valuable.
Document Capture / Invoice Capture (Copilot)
Business Central’s Copilot-powered Invoice Capture can extract invoice data from PDF attachments and pre-populate purchase invoice fields — vendor, amount, due date, line items. It’s not perfect and it needs human review, but for high-volume AP teams it reduces manual entry significantly. This is an included Copilot feature — no extra license required, though it needs to be enabled in your BC configuration.
Vendor Ledger Entries
The Vendor Ledger Entries page is your complete history of every AP transaction for a vendor — every invoice, every payment, every credit memo. It’s also where you can see which entries are open (unpaid) versus closed (paid). When a vendor calls with a question about payment status, this is the first place your AP team should go. Train them on it specifically.
Aged Accounts Payable Report
BC’s AP aging report shows outstanding vendor balances organized by how long they’ve been outstanding — current, 30 days, 60 days, 90+ days. Your controller will want to see this at every month end. The report is only as accurate as your invoice posting dates and due dates are correct — which circles back to why those header fields on the invoice matter so much.
Bank Account Reconciliation
Posted payments appear in BC’s bank reconciliation as outstanding items until they’re matched against your bank statement. BC can import bank statement files and automatically match transactions, significantly reducing manual reconciliation time. The reconciliation is also where voided checks, returned ACH transactions, and bank fees get recorded. Don’t treat it as optional — it’s what keeps your book cash balance trustworthy.
Recurring Purchase Journals
For invoices that repeat every period with the same amount and coding — monthly rent, annual insurance premium, recurring service fees — BC’s recurring journal feature lets you set up a template that posts automatically on a schedule. Your AP team sets it up once and the system handles it going forward. Significantly less manual entry, significantly fewer opportunities for error.
The Mistakes That Cost BC AP Teams the Most
Using Today’s Date as the Document Date on Every Invoice
This is the single most consistent AP data quality problem I see in BC implementations, especially in the first few months after go-live when the team is still building habits. The document date drives the due date. If an invoice is dated November 15th on the vendor’s invoice but gets entered with a December 3rd document date because that’s when the AP team processed it, the due date is wrong by eighteen days. Multiply that across a hundred invoices per month and your AP aging becomes unreliable and your vendor relationships show the strain.
→ Make it a non-negotiable AP procedure: the Document Date field on every purchase invoice gets the date that is printed on the vendor’s invoice. Not today’s date. Not the posting date. The vendor’s date. Print this in large letters in your AP procedure document if you need to. It matters that much.
Skipping the Payment Suggestion Review Step
Suggest Vendor Payments generates a proposal. It is not a final payment run. I have watched AP teams generate the suggestion, glance at the total, and immediately click Post without reviewing individual lines — because they ran twenty payment batches before this one and it always looked right. Then one cycle a vendor appears whose invoice was being disputed, or a duplicate invoice that slipped through gets included, and the payment goes out before anyone catches it. Recovering overpayments from vendors is uncomfortable at best and sometimes impossible.
→ Build the review step into your payment run procedure as an explicit checkpoint with a second set of eyes — ideally the AP manager reviewing lines before the AP team member posts. Make it feel like a safety inspection, not a formality. Because that’s exactly what it is.
Vendor Credits Left Unapplied in the Ledger
When a vendor issues a credit memo — for a return, a pricing correction, an overbilling — it creates an open credit entry in the vendor ledger. If that credit isn’t applied to an open invoice, it sits there indefinitely. Your AP aging shows the credit as outstanding but nobody acts on it. Months go by. When someone finally runs a vendor ledger report they find a collection of old credits that should have reduced payments long ago. Meanwhile you paid full price on invoices that should have been net of credits you were entitled to.
→ As part of your monthly AP close review, run a vendor ledger report filtered to show open credit entries. Any credit older than 30 days that hasn’t been applied to an invoice needs to be investigated. Either apply it to an open invoice, request a refund from the vendor, or document why it’s being held open.
No Invoice Number Standardization Leading to Duplicate Payments
BC’s duplicate invoice detection compares the Vendor Invoice No. field against previously posted invoices for the same vendor. But it’s a character-for-character comparison. “INV2024-1188” and “2024-1188” and “INV 2024 1188” are three different strings to BC even if they represent the same invoice from the same vendor. A vendor who resubmits an invoice with slightly different formatting, or an AP team member who enters it slightly differently the second time, slips right past the detection. You pay twice. The vendor is quietly pleased.
→ Establish and document a vendor invoice number entry convention during implementation — and enforce it. Strip leading zeros, strip the “INV-” prefix, keep the spaces, whatever you decide. The important thing is that everyone follows the same convention so BC’s detection actually catches what it’s designed to catch. Run a periodic duplicate payment check report as an additional safety net.
Not Testing the Bank Payment File Format Before Go-Live
BC generates electronic payment files in the format you configure — NACHA, SEPA, or bank-specific. That configuration needs to be done during implementation and the file output needs to be validated with your actual bank before the first live payment run. Banks have specific file format requirements, and a file that doesn’t meet those requirements gets rejected. Discovering that your payment file format is wrong on a Friday afternoon when vendors are expecting to be paid is one of the more stressful go-live experiences available to you.
→ Schedule a pre-go-live testing session with your bank’s treasury operations team. Generate a test payment file in BC and have your bank validate it against their technical specifications. Get a written confirmation that the format is accepted. Do this at least two weeks before go-live so there’s time to address any format issues without a crisis.
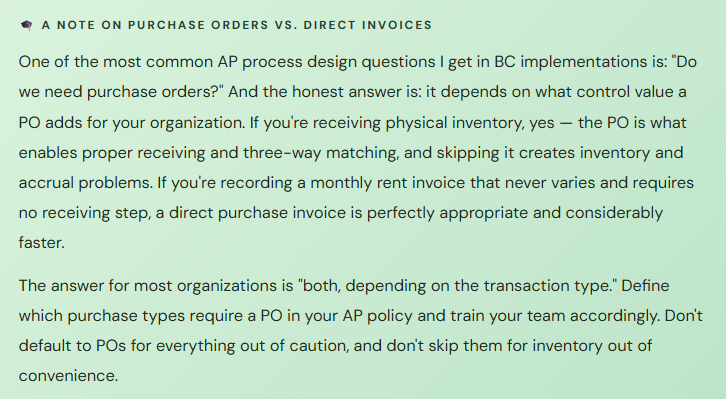
Routing All Invoices Through Purchase Orders When POs Aren’t Needed
This is the opposite of skipping POs when you should have them. Some organizations, in a well-intentioned attempt at control, require purchase orders for every invoice including utilities, monthly subscriptions, and other recurring expenses that never vary. This creates a mountain of PO paperwork for transactions where the PO adds no matching value, slows down invoice processing, and frustrates the AP team without meaningfully improving the financial controls. The PO’s value comes from the receiving and matching step — for invoices where there’s nothing to receive, it’s just friction.
→ Define your PO policy by transaction type during implementation. Physical goods and services with variable quantities and prices: require a PO. Fixed recurring expenses: direct invoice. Set a dollar threshold below which a PO is optional. Build these rules into your AP procedures so the team knows when to create a PO and when to go directly to invoice entry.
Quick Reference: Do’s and Don’ts
✓ Do This
- Set Vendor Posting Group and Gen. Bus. Posting Group on every vendor record — without them, nothing posts
- Set currency code on every foreign currency vendor before any transactions are entered
- Match Document Date to the date on the vendor’s actual invoice — every time, no exceptions
- Set up 1099 codes on eligible vendors before any transactions post
- Assign default dimensions to vendor cards during data migration
- Standardize vendor invoice number entry format and communicate it to the whole team
- Configure and test the approval workflow — including delegation — before go-live
- Review the Suggest Vendor Payments output before posting every payment run
- Validate your electronic payment file format with your bank before the first live run
- Apply vendor credits to open invoices — review unapplied credits monthly
- Define a PO policy by transaction type — not “POs for everything” or “POs for nothing”
- Attach vendor invoice PDFs to purchase invoice records as standard practice
✗ Don’t Do This
- Use today’s date as the Document Date because it’s faster to enter
- Skip the Suggest Vendor Payments review and post directly from the suggestion
- Let vendor credits sit unapplied in the ledger month after month
- Enter vendor invoice numbers inconsistently and rely on BC’s detection to catch all duplicates
- Configure the payment file format without testing it with your actual bank
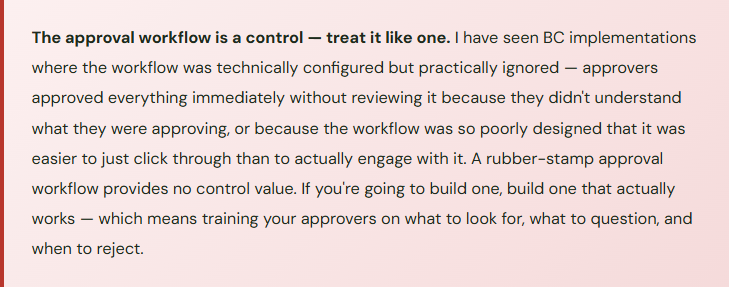
- Build a rubber-stamp approval workflow that approvers click through without reviewing
- Set up approval workflows without configuring delegation for vacation coverage
- Require POs for recurring fixed expenses where the receiving step adds no value
- Skip POs for inventory purchases because it’s faster — you lose receiving control and accrual accuracy
- Forget that GL accounts used on invoice lines also need Gen. Prod. Posting Groups
- Ignore the AP aging report at month end — it’s the scoreboard of your AP health
The honest summary from someone who’s closed a lot of month ends: AP in BC is genuinely manageable. It’s not simple — nothing in accounting is truly simple once real money is involved — but it’s accessible in a way that F&O is not. A thoughtful implementation, a well-trained team, and a handful of solid procedural habits will take you very far. The mistakes we covered today are almost all habit failures, not system limitations. The system can do the right thing every time. The habits are what make sure it does.
Up Next:
We’ve done AP. Next up is the mirror image: Accounts Receivable in Business Central end-to-end — customer setup, sales documents, cash receipts, and the collections tools BC gives you to stay on top of what customers owe. We’ll cover the full order-to-cash lifecycle with the same plain-language approach, and I’ll share the AR-specific configuration decisions that most BC teams either get wrong or never think to make at all.
Until then — date your invoices correctly, review your payment suggestions, and for the love of all things balanced, set up your 1099 codes before any transactions post.
— Bobbi
D365 Functional Architect · Recovering Controller
Leave a Reply